在公網域劃出自己的領域, 自立為王! 讓全世界看得到我!
Story
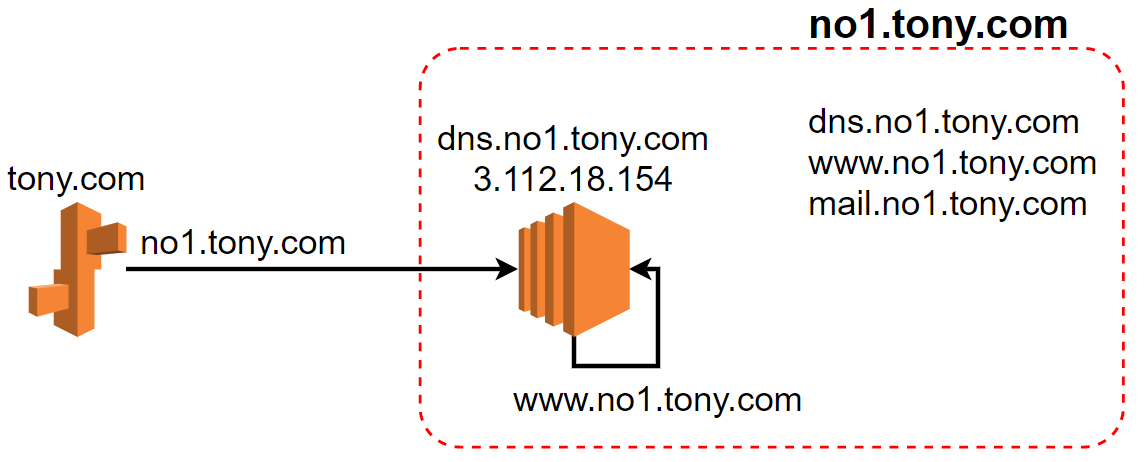
今天我們公司的網域, 名為 tony.com, 然後我是它旗下的一個事業單位, 我想註冊在它底下, 名為 no1.tony.com, 然後再把我的 Web Server 註冊到 www.no1.tony.com, 將來我的網站全世界都看得到了~~~
Prerequest
本文假設你已經有 DNS - 子網域自治區 的觀念
- DNS:
- 上層 DNS(管轄
tony.com)
- 上層 DNS(管轄
- VM with a public IP:
- 下層 DNS(管轄
no1.tony.com), 本文以 EC2 安裝named來示範 - Web Server (與下層 DNS 同一台, 並架設 Apache)
- 下層 DNS(管轄
如果上面在講啥你看不懂, 請勿浪費時間繼續看下去
Implementation
- 上層 DNS 設定方式
- 下層 DNS(Web Server) 作業方式
- Web Service
- Security Group
1. 上層 DNS 設定方式
新增兩筆 Resource Record:
| Name | Type | Value | TTL |
|---|---|---|---|
| no1.tony.com. | NS | dns.no1.tony.com. | 5 |
| dns.no1.tony.com. | A | 3.112.18.154 | 5 |
注意 FQDN 後面都要有個「.」
上頭的直覺意涵為:
- 將來
no1.tony.com這個領域, 都交由dns.no1.tony.com這台來管理 dns.no1.tony.com的 IP 位於3.112.18.154
2. 下層 DNS(Web Server) 作業方式
首先 ssh 到你的 EC2 (這裡不作遠端連線的教學…)
# DNS 套件, DNS 安全性套件
$# yum install -y bind bind-chroot

$# vim /etc/named.conf
# ---- 修改部份如下 ----
    listen-on port 53 { any; };
    allow-query     { any; };

zone "no1.tony.com" IN {
    type master;
    file "named.no1.tony.com";
};

zone "172.31.32.in-addr.arpa" IN {
    type master;
    file "named.172.31.32";
};
# 這裡為啥是 「172.31.32」, 這跟 VLSM 有關, 但其實你可以別理他...
# 從頭到尾名字都取一樣應該也不會有錯才對~
# ---- 修改部份如上 ----

$# vim /var/named/named.no1.tony.com
# ---- 修改部份如下 ----
$TTL    5
@       IN      SOA     dns.no1.tony.com.   root.no1.tony.com. (
    2019010501  30  20  600 10 )
@       IN      NS      dns.no1.tony.com.
dns     IN      A       3.112.18.154
www     IN      A       3.112.18.154
# ---- 修改部份如上 ----

$# vim /var/named/named.172.31.32
# ---- 修改部份如下 ----
$TTL    5
@   IN  SOA dns.no1.tony.com.    root.no1.tony.com. (
    2019010501  30  20  600 10 )
@               IN  NS  dns.no1.tony.com.
3.112.18.154    IN  PTR dns.no1.tony.com.
3.112.18.154    IN  PTR www.no1.tony.com.
# ---- 修改部份如上 ----

$# systemctl start named

$# grep 2019010501 /var/log/messages
Jan  5 07:35:22 ec2 bash: zone no1.tony.com/IN: loaded serial 2019010501
Jan  5 07:35:22 ec2 bash: zone 172.31.32.in-addr.arpa/IN: loaded serial 2019010501
Jan  5 07:35:22 ec2 named[1453]: zone 172.31.32.in-addr.arpa/IN: loaded serial 2019010501
Jan  5 07:35:22 ec2 named[1453]: zone no1.tony.com/IN: loaded serial 2019010501
# 要有看到 serial 已經被套用了哦~~
3. Web Service
- 安裝 httpd
- 製作測試網頁
- 啟動服務
$# yum install -y httpd
$# echo '這裡是 www.no1.tony.com' > /var/www/html/index.html
$# systemctl start httpd

$# curl http://www.no1.tony.com
這裡是 www.no1.tony.com
4. Security Group
前往 Security Groups AWS Console
新增底下規則~~
| Type | Protocol | Source |
|---|---|---|
| HTTP | TCP | 你的電腦 IP 或是 Any where |
| DNS (UDP) | UDP | 你的電腦 IP 或是 Any where |
| DNS (TCP) | TCP | 你的電腦 IP 或是 Any where |
5. Testing
開啟你的瀏覽器, 前往「http://www.no1.tony.com」, 你應該就能看到剛剛弄出來的測試網頁了!
後記
以上的 Route53 及 EC2 架設 DNS 的玩法, 不作任何安全性保證!